Resource 1: D365 Local User Groups – Microsoft Dynamics 365 local User Groups are in-person quarterly meetings that are open to Microsoft Dynamics 365 users.
Resource 2:Microsoft Docs – Learn new skills and discover the power of Microsoft products with step-by-step guidance. Start your journey today by exploring our learning paths and modules.
Resource 3: Cloud Perspectives – Official blogs about Microsoft services that give insight on current or new technologies.
Resource 4:Virtual Events Hub – A centralised view of Microsoft Community Virtual events – By the Community for EVERYONE!
Resource 5:#PowerAddict – An individual with an almost obsessive need and desire to bring positive change, solve problems and automate processes with theMicrosoft Power Platform. Watch this short video to learn more about the #PowerAddicts global community.
To successfully pass the Exam MB-200: Microsoft Power Platform + Dynamics 365 Core, it is highly important to understand the exam objectives:
Perform discovery, planning, and analysis (5-10%)
Manage user experience design (20-25%)
Manage entities and data (15-20%)
Implement security (5-10%)
Implement integration (15-20%)
Perform solutions deployment and testing (25-30%)
Exam Overview
The exam includes 40-60 questions. The questions will appear in the form of multiple-choice. The candidate will get 120 minutes to complete the exam, in total, they get 120 minutes.
This blog post is a quick walkthrough on how to import solutions to Dynamics 365.
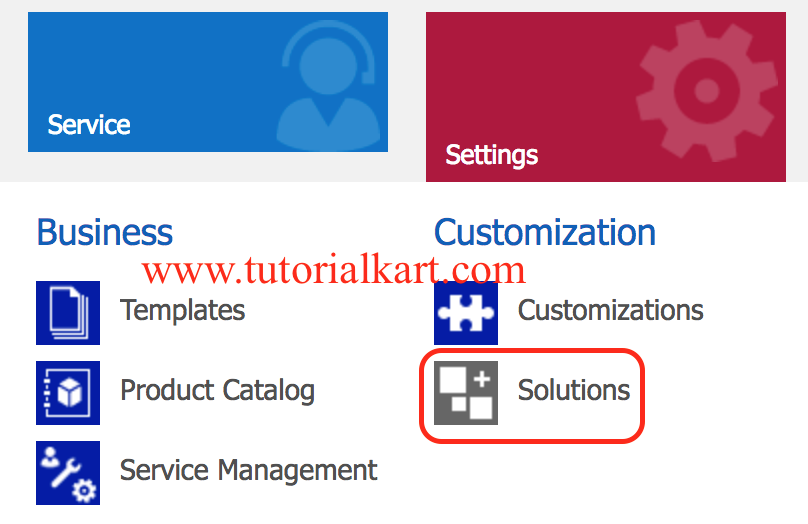
Step 1: Navigate to Advance Settings | Settings | Solutions.
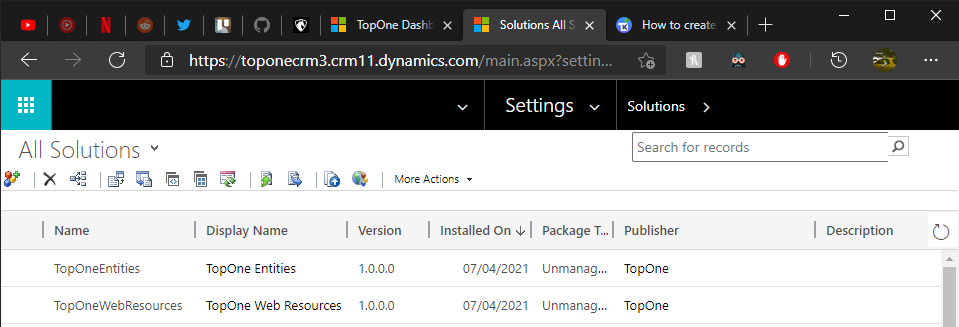
Step 2: Select the necessary solutions and export the ones you wish to import to another instance. (Make sure they’re unmanaged)
Make sure to click on the export button
Step 3: Navigate to the instance you wish to upload your exported solutions.
Step 4: Repeat Step 1.
Step 5: We can now select the import button where you will be prompted to upload your zip file downloaded from Step 2.
Make sure to click on import button.
Step 6: Because we are importing unmanaged solutions we will be given an extra prompt. This prompt is only to warn you that an unmanaged solution, the customizations are written to the system like you have done them manually. This means after uninstalling an unmanaged solution, nothing happens. All customizations are still in the system. This is helpful to transfer your customizations but may offer problems if you would like to roll back to the state before you installed the solution.
Actually it does depend on where you would store the files.
Traditional standard solution is to embed a YouTube video within an iframe/html web resource on a form in a model driven app
PCF (PowerApps Component Framework) control would be the new way of embedding videos such as YouTube/Vimeo etc an example has already been created and showcased on PCF Gallery here – https://pcf.gallery/youtube-player/
This post will show you how to create a simple workflow using Dynamics 365.
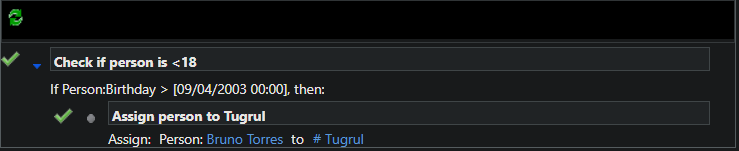
In this example I will be creating a workflow where I will check to see if a person is over the age of 18, if this is true the person will be assigned to contact Tugrul (which is me).
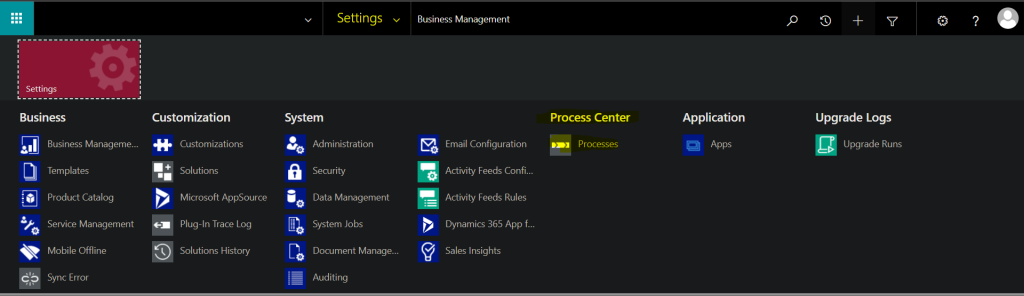
Step 1: First we need to navigate to our Dashboard and go to the advanced settings which are located on the top right-hand side of the window.
Step 2: From the advanced settings window we can navigate to the Processes page from the drop-down menu.
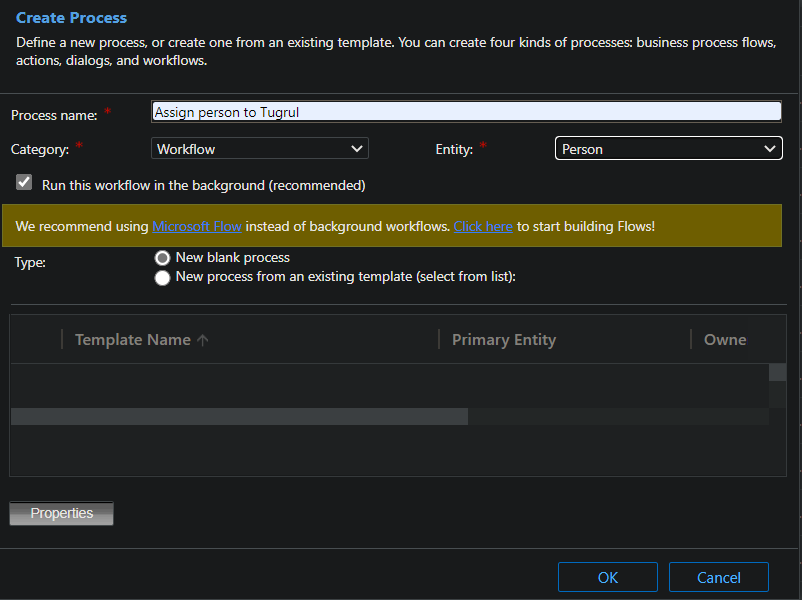
Step 3: From the Processes window we can see all of the previous process created by default alongside any custom ones we may have created ourselves. We can now click on +New on the top left to create our own process. A prompt will appear on the screen which will ask us to fill in the necessary details. From the image below you can see the details, I have filled in to create our workflow.
Create new processProcesses prompt
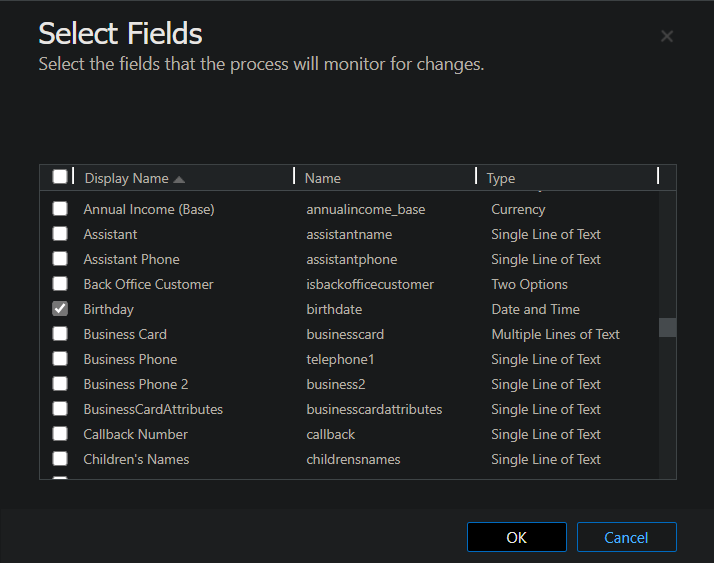
Step 4: The first thing to do once we have created our process is to check the ‘Records field change’ under ‘Start when’. You can then click on the ‘View’ and select the relevant record we will like to set a listener on which in my case is birthday.
Select Birthday record
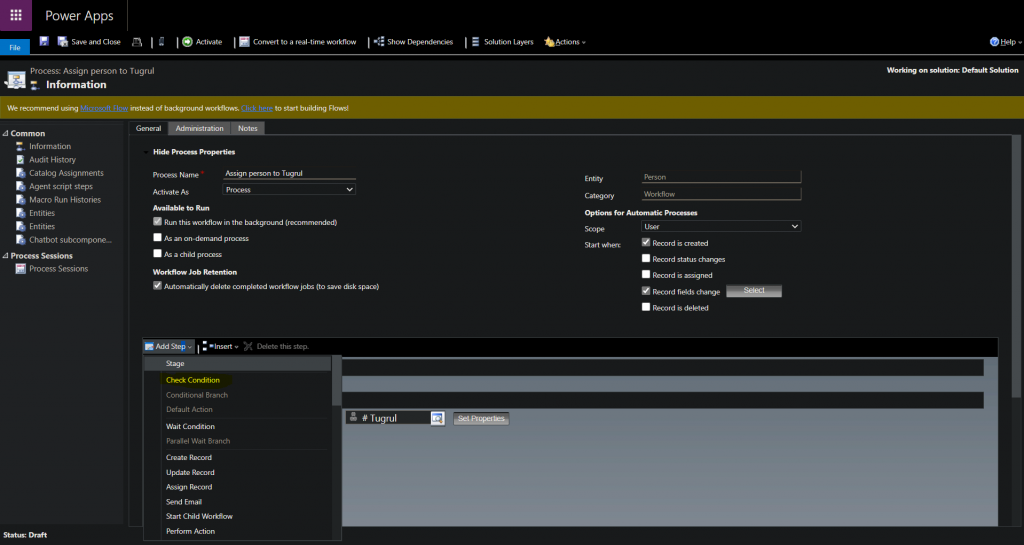
Step 5: Once we have selected the relevant fields it is now time to ‘Add Step’ and select the ‘Check Condition’ step so we can set our if statement to check if a person is under the age of 18.
Add step check condition
Step 6: We can now add our if statement which will select the entity Person, select Birthday field, add Greater Than clause and finally select current date to see if Person is <18.
Specify condition
Step 7: Once we have specified our conditions we can now save and Activate our process.
Activate process
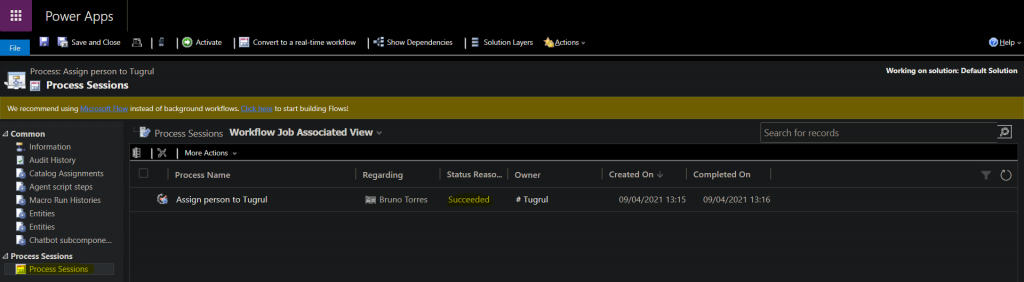
Step 8: Finally we can check if our process is working by creating a new contact with a relevant date of birth or change a person date of birth who already exists in our database. We can check this by going to our processes and on the left-hand side selecting Process Sessions.
If everything goes well you should be able to see the status as succeeded and it will show whether the user was assigned correctly or not.
The objective of this post is to demonstrate the steps needed in order to create new entities in Dynamics 365.
Step 1: Navigate to Settings | Customizations
Step 1
Step 2: Click on the Solutions tab. Select TopOneEntities solution to create an entity.
Step 2
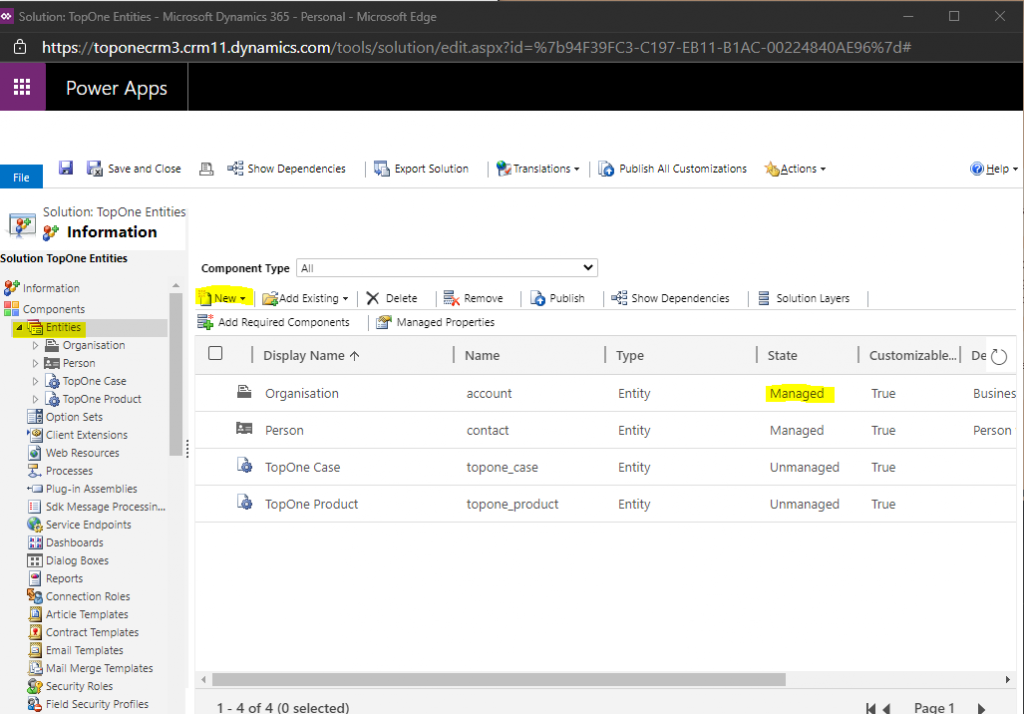
Step 3: Click on Entities, then on the command bar, click New as shown below or you can select a pre-existing one
Step 3
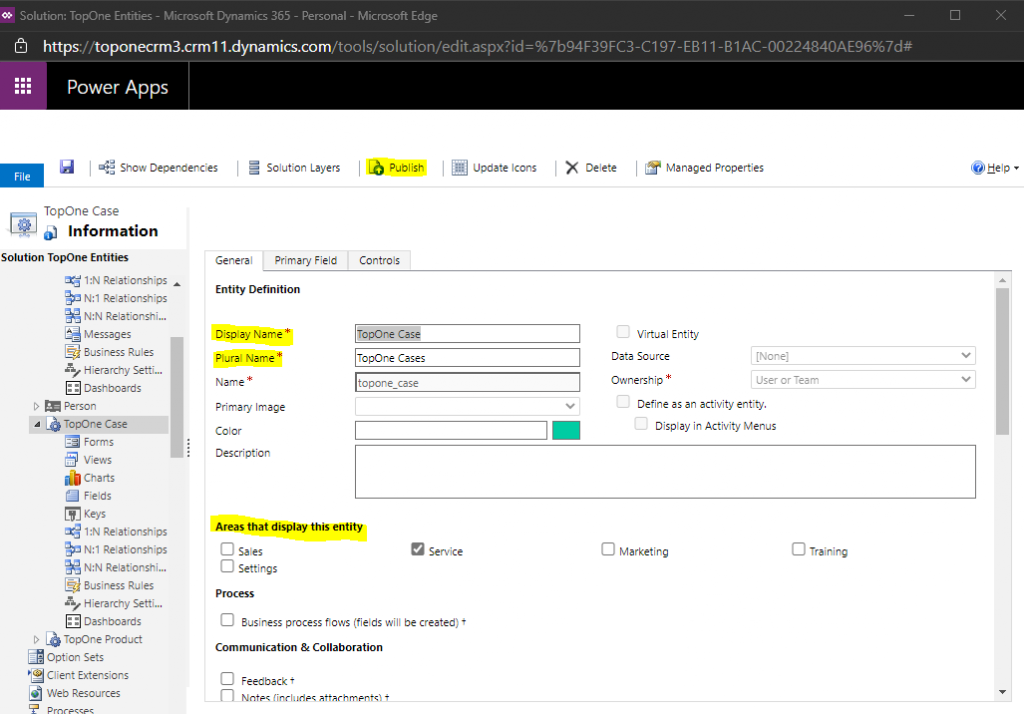
Step 4: Enter the Display Name and Plural Name that will be used for this entity throughout Microsoft Dynamics 365.
Also, select the area that displays this entity, this will be dependent on which services you need this entity to show up on. Finally, once all changes are made be sure to Publish any changes made otherwise the changes will not take effect.
Step 4
Step 5: In the Ownership list, select one of the following:
User or Team. Records for this entity can be owned by individual users or by teams. Security can be defined according to the business unit with which the current owner is associated. For example, contact records are set to User or Team.
Organization. Records for this entity are used for reference by all Microsoft Dynamics 365 users. Individual users or teams can’t own these records. For example, product records are set to Organization.
Finally click on Save button and the publish button so all changes take effect.
It works the same way the cloud flow word template where you can populate the repeating table with the normal value. (you can use formatted value instead)
By the way, did you try to populate in PowerFlow subgrid (related records) for given entity ? In OOT word template you can repeat rows (special control) , but how about Power Flow ? – Populate a Microsoft Word template. in one record e.g. payment you can have multiple reviews to populate in Word template from sub grid. I am not sure it is possible to do at Power Flow at all
Alternative option is Documents Corepack for all projects
The full expression is Triggeroutputs()?[‘body/_leadqualitycode_label’].
The main issue I have is that this will only work with the CDS connector and not the CDS (current environment) connector as the label value is not returned in the JSON for the CDS (current environment) connector. I hope this is fixed in the future as the current environment connector provides more Actions and is more efficient for processing lists of record.
If you wanted to do this from a different record than the record that triggered the flow then use the Get Record action and then the following expression Outputs(‘Get_record’)?[‘body/_leadqualitycode_label’] where ‘Get_record’ is the name of the action.