This post will show you how to create a simple workflow using Dynamics 365.
In this example I will be creating a workflow where I will check to see if a person is over the age of 18, if this is true the person will be assigned to contact Tugrul (which is me).
Step 1: First we need to navigate to our Dashboard and go to the advanced settings which are located on the top right-hand side of the window.
Step 2: From the advanced settings window we can navigate to the Processes page from the drop-down menu.

Step 3: From the Processes window we can see all of the previous process created by default alongside any custom ones we may have created ourselves. We can now click on +New on the top left to create our own process. A prompt will appear on the screen which will ask us to fill in the necessary details. From the image below you can see the details, I have filled in to create our workflow.


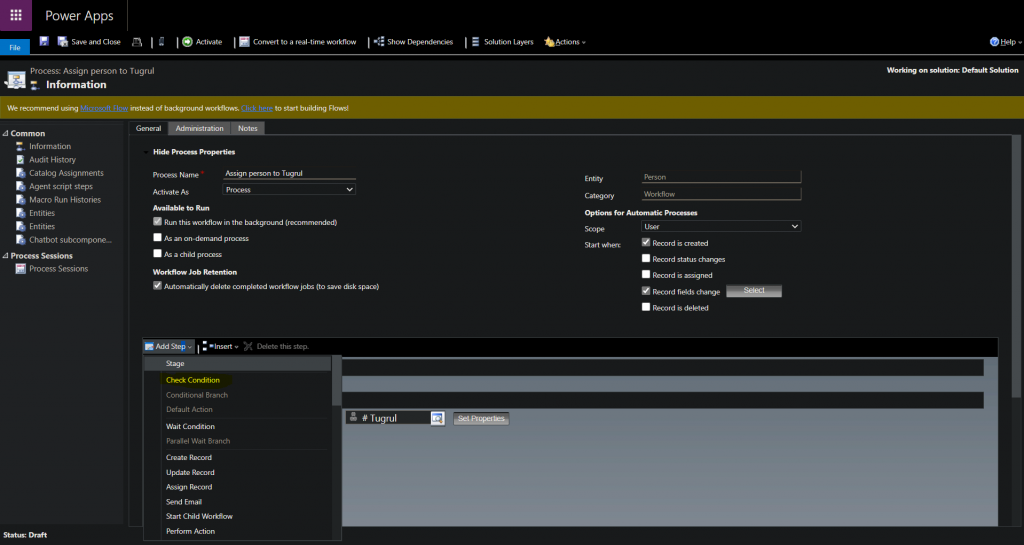
Step 4: The first thing to do once we have created our process is to check the ‘Records field change’ under ‘Start when’. You can then click on the ‘View’ and select the relevant record we will like to set a listener on which in my case is birthday.

Step 5: Once we have selected the relevant fields it is now time to ‘Add Step’ and select the ‘Check Condition’ step so we can set our if statement to check if a person is under the age of 18.

Step 6: We can now add our if statement which will select the entity Person, select Birthday field, add Greater Than clause and finally select current date to see if Person is <18.

Step 7: Once we have specified our conditions we can now save and Activate our process.

Step 8: Finally we can check if our process is working by creating a new contact with a relevant date of birth or change a person date of birth who already exists in our database. We can check this by going to our processes and on the left-hand side selecting Process Sessions.

If everything goes well you should be able to see the status as succeeded and it will show whether the user was assigned correctly or not.

