“Get closer than ever to your customer. So close that you tell them what they need well before they realize it themselves.”
– Steve Jobs
“Get closer than ever to your customer. So close that you tell them what they need well before they realize it themselves.”
– Steve Jobs
If you are looking for a simple way to manage your business, TopOneCRM is a cost-effective and affordable CRM solution. Our approach is to keep it simple and deliver quality solution.
Microsoft flow helps you to simplify your day to day repetitive tasks to flows, that can run or execute automatically without much manual intervention.
If you are a little familiar with Dynamics 365 processes or out of box workflows, where we usually configure actions for a repetitive task.
We will create a basic flow which will email new contacts created in Dynamics from the administrator confirming the contact has been created.
Step 1: Access Microsoft flow directly from this URL: https://flow.microsoft.com
Step 2: Or if you have an Office 365 subscription, you can directly access Power Automate or flow from the Office 365 App launcher.

Step 3: On the left hand of the screen we can navigate to “My flows” and select “New Flow” and from this dropdown menu we select “Automated cloud flow”.

Step 4: You will see a prompt window like below, we can set the flow name to test. From this window, we can search “dynamics” and select the following “flow trigger” – “When a record is created”.

Step 5: Now we can select the entity’s from our Dynamics 365 which we would like to select to help automate our task. In the example below I have selected “People” and “Email Messages”. This is so when a new Person (People) is created we would like to send an email to the new contact confirming a Contact has been created. Once we have the correctly selected organisation and entity we can now click on the drop-down menu “Show advanced options”.

Step 6: Now we can select the sender of the email, which will be the First Name. This will include the name of the sender which the contact will see in the automated email that will be sent to them.

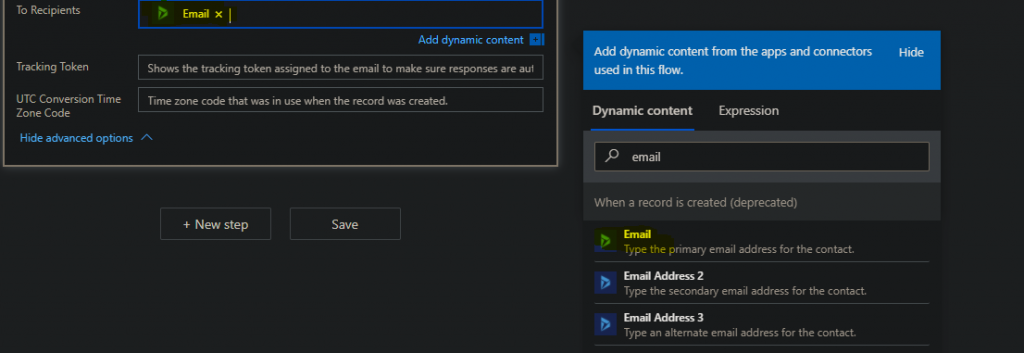
Step 7: Now we have to set the recipient of the Email. This will be email that is entered upon creation of the contact in Dynamics. It is set so every new entry in contacts will look for the email and send it to that address.
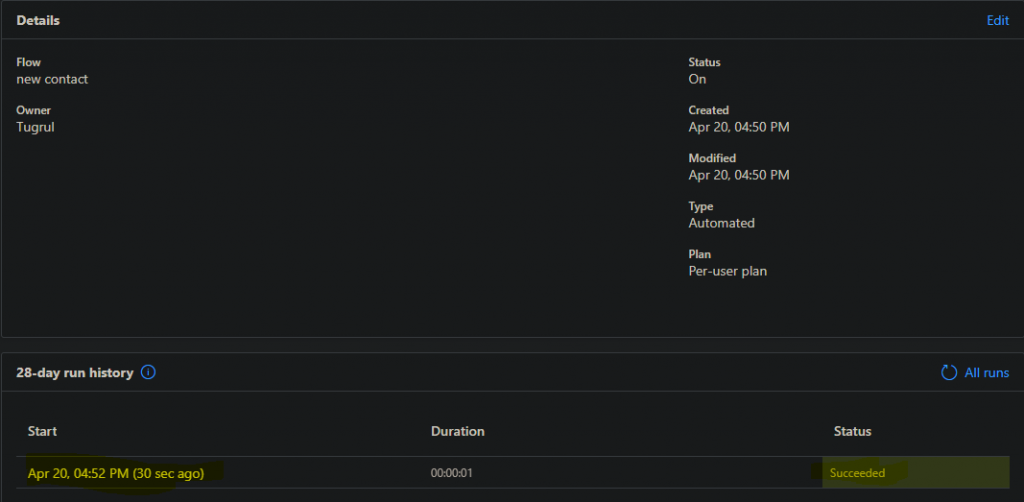
Step 8: Finally we can test our Flow by selecting test on the top right of the screen. Here we can select manual test and create our Contact in Dynamics 365. Once the contact is created with an Email we will see a Succeeded message on our test, and if expanded it should list the email entered when Contact is created.
Resource 1: D365 Local User Groups – Microsoft Dynamics 365 local User Groups are in-person quarterly meetings that are open to Microsoft Dynamics 365 users.
Resource 2: Microsoft Docs – Learn new skills and discover the power of Microsoft products with step-by-step guidance. Start your journey today by exploring our learning paths and modules.
Resource 3: Cloud Perspectives – Official blogs about Microsoft services that give insight on current or new technologies.
Resource 4: Virtual Events Hub – A centralised view of Microsoft Community Virtual events – By the Community for EVERYONE!
Resource 5: #PowerAddict – An individual with an almost obsessive need and desire to bring positive change, solve problems and automate processes with the Microsoft Power Platform. Watch this short video to learn more about the #PowerAddicts global community.
This blog post is a quick walkthrough on how to import solutions to Dynamics 365.
Step 1: Navigate to Advance Settings | Settings | Solutions.
Step 2: Select the necessary solutions and export the ones you wish to import to another instance. (Make sure they’re unmanaged)

Step 3: Navigate to the instance you wish to upload your exported solutions.
Step 4: Repeat Step 1.
Step 5: We can now select the import button where you will be prompted to upload your zip file downloaded from Step 2.

Step 6: Because we are importing unmanaged solutions we will be given an extra prompt. This prompt is only to warn you that an unmanaged solution, the customizations are written to the system like you have done them manually. This means after uninstalling an unmanaged solution, nothing happens. All customizations are still in the system. This is helpful to transfer your customizations but may offer problems if you would like to roll back to the state before you installed the solution.

This post will show you how to create a simple workflow using Dynamics 365.
In this example I will be creating a workflow where I will check to see if a person is over the age of 18, if this is true the person will be assigned to contact Tugrul (which is me).
Step 1: First we need to navigate to our Dashboard and go to the advanced settings which are located on the top right-hand side of the window.
Step 2: From the advanced settings window we can navigate to the Processes page from the drop-down menu.

Step 3: From the Processes window we can see all of the previous process created by default alongside any custom ones we may have created ourselves. We can now click on +New on the top left to create our own process. A prompt will appear on the screen which will ask us to fill in the necessary details. From the image below you can see the details, I have filled in to create our workflow.


Step 4: The first thing to do once we have created our process is to check the ‘Records field change’ under ‘Start when’. You can then click on the ‘View’ and select the relevant record we will like to set a listener on which in my case is birthday.

Step 5: Once we have selected the relevant fields it is now time to ‘Add Step’ and select the ‘Check Condition’ step so we can set our if statement to check if a person is under the age of 18.
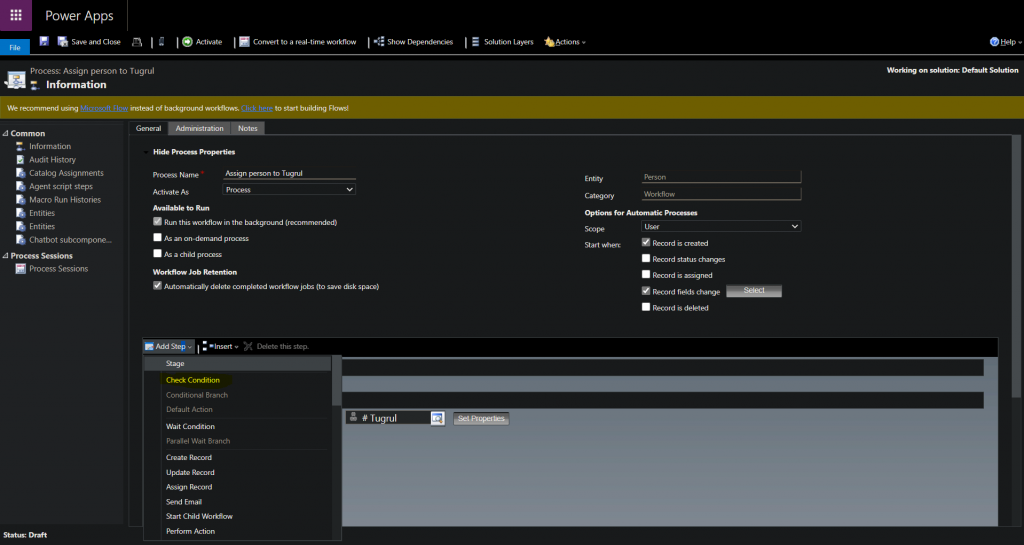
Step 6: We can now add our if statement which will select the entity Person, select Birthday field, add Greater Than clause and finally select current date to see if Person is <18.

Step 7: Once we have specified our conditions we can now save and Activate our process.

Step 8: Finally we can check if our process is working by creating a new contact with a relevant date of birth or change a person date of birth who already exists in our database. We can check this by going to our processes and on the left-hand side selecting Process Sessions.

If everything goes well you should be able to see the status as succeeded and it will show whether the user was assigned correctly or not.

The objective of this post is to demonstrate the steps needed in order to create new entities in Dynamics 365.
Step 1: Navigate to Settings | Customizations
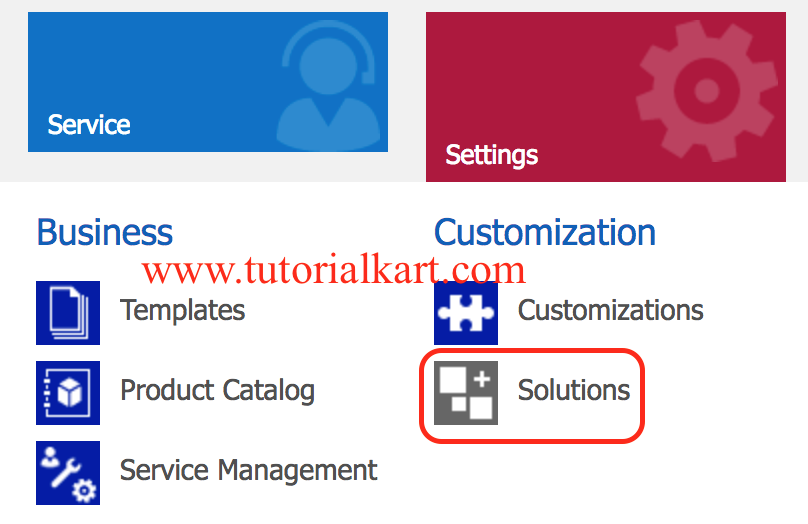
Step 2: Click on the Solutions tab. Select TopOneEntities solution to create an entity.

Step 3: Click on Entities, then on the command bar, click New as shown below or you can select a pre-existing one
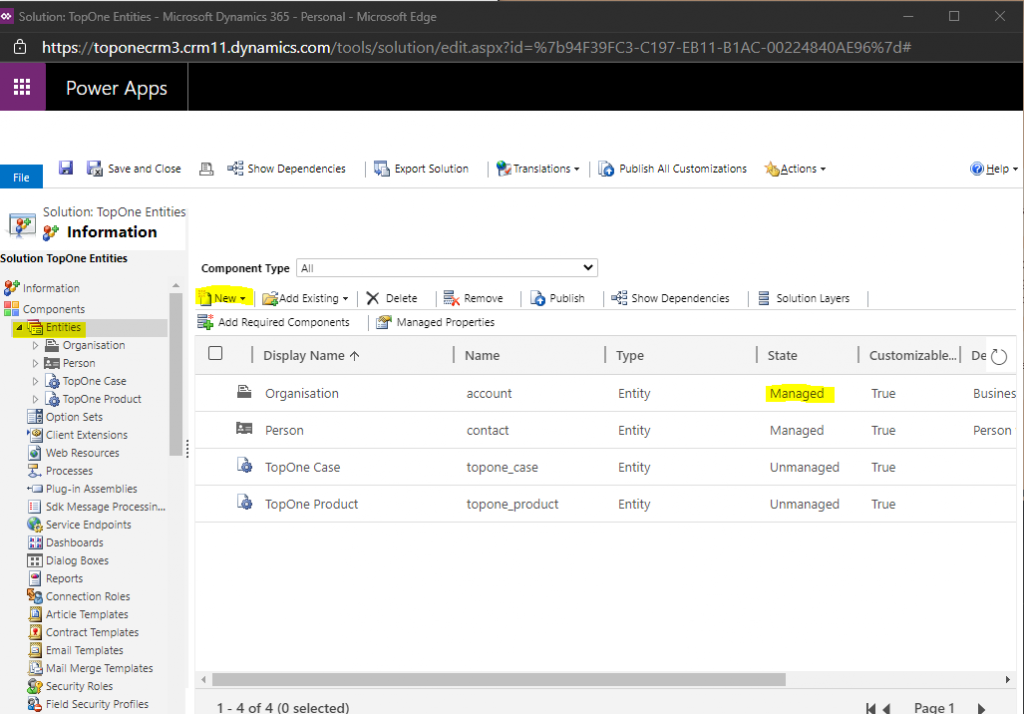
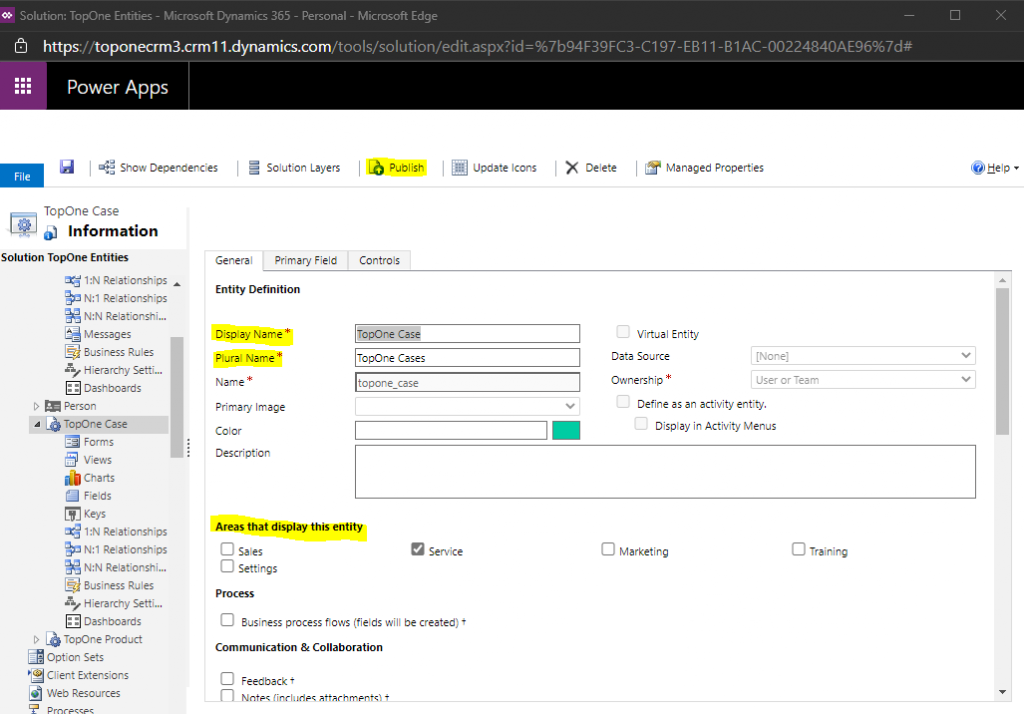
Step 4: Enter the Display Name and Plural Name that will be used for this entity throughout Microsoft Dynamics 365.
Also, select the area that displays this entity, this will be dependent on which services you need this entity to show up on. Finally, once all changes are made be sure to Publish any changes made otherwise the changes will not take effect.
Step 5: In the Ownership list, select one of the following:
User or Team. Records for this entity can be owned by individual users or by teams. Security can be defined according to the business unit with which the current owner is associated. For example, contact records are set to User or Team.
Organization. Records for this entity are used for reference by all Microsoft Dynamics 365 users. Individual users or teams can’t own these records. For example, product records are set to Organization.
Finally click on Save button and the publish button so all changes take effect.
This quick guide is to show users how to create their custom dashboards on Dynamics 365 and how to switch quickly between different dashboards. The image below displays a custom dashboard created by us. It demonstrates the different type of data that can be displayed on a dashboard.
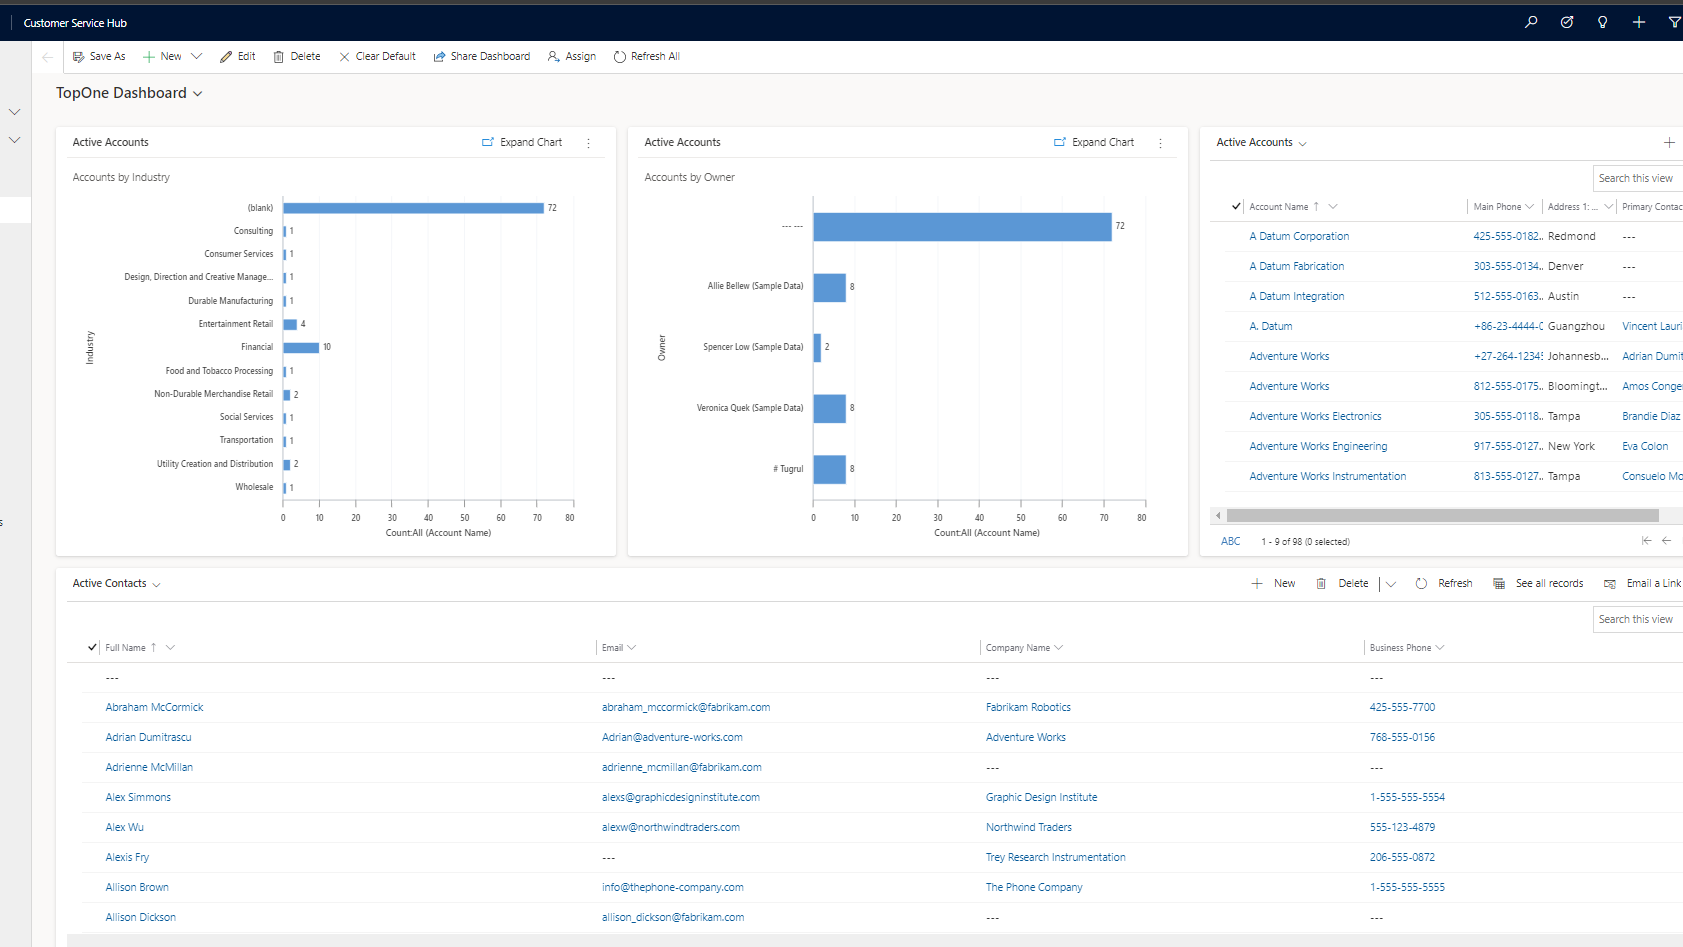
How to view different dashboards:
On the top left of the dashboard there is a dropdown menu which displays all of the pre configured dashboards created by default. When users create their own dashboards they’re also stored here.
Creating new dashboard:

On the header of the dashboard page we can see a bar which looks like the image above. On that bar click on new and select “Dynamics 365 Dashboard”.

You’ll be prompted to pick your desired layout, there are a few pre-sets but these can be configured after being created. Once selected users will see a new pop-up on their screen with a template of the layout chosen.

From this layout editor users are free to add and remove elements from their dashboards. The example above shows the 3-column regular dashboard. Users can insert charts, lists, assistants, Iframe and web resources into any of these blocks. The layout editor also allows to remove blocks, change positions and even increase/decrease the height and width of the blocks (some blocks need to removed for this). Once users are happy with their layout they can save the changes and close the window. Now everything has been set we can go to the drop down menu on the top left and select our dashboard which will have the name the user has set on the layout editor.
What is Dynamics 365? It is a set of connected modular SaSS applications and services designed to transform and enable core customer, employee and business activities.
Overview:
Modules (Organisations can choose from the following Microsoft Dynamics 365 applications and features):
CRM stands for Customer Relationship Management. It’s a technology used to manage interactions with customers and potential customers. A CRM system helps organisations build customer relationships and streamline processes so they can increase sales, improve customer service, and increase profitability.
The goal of CRM is to improve business relationships with their customers, this is achieved through customer retention and customer acquisitions (in laymen’s terms it is holding on to your current customers and the ability to gain new customers overtime).
Different uses of CRM:
Benefits of CRM:
The use of the information above CRM allows a company to take a look at the level of customer support they provide along with raw data which in return allows them to implement/change strategy depending on the business/customer needs at any time. As a result of this information provided a business should be able to increase customer satisfaction, engagement and profits. A CRM is just one of the many tools a successful business should be using as a means to improve profits and customer acquisitions.